
For creative people, a swipe file is an invaluable asset that you can use to superpower your creative projects. When you need inspiration, a well-stocked swipe file can provide to you with approaches and elements that can become seeds for a valuable solution.
Just what is a swipe file and why should you create one? As its name implies, you start by being on the lookout for interesting creative bits of content or ideas. You swipe them; that is to say, you print them out or save them electronically into a file that you can easily access whenever you need them.
Just remember: The purpose of a swipe file is inspiration, not plagiarism. It should serve as a catalyst back and get your brain started thinking and creative need directions. This is especially useful when you’re stuck.
If you are dedicated to adding fascinating content to your swipe file, soon it will become an incredible resource that can help you jumpstart your muse when you need it most.
My first swipe file
As a content strategist and marketer, I brainstorm and create content every day. Because everyone is so over-messaged today, it can’t just be any old content – it must command attention and compel action. That means it needs to be creative. It must stand out from all of the other content people have an opportunity to consume at any given moment.
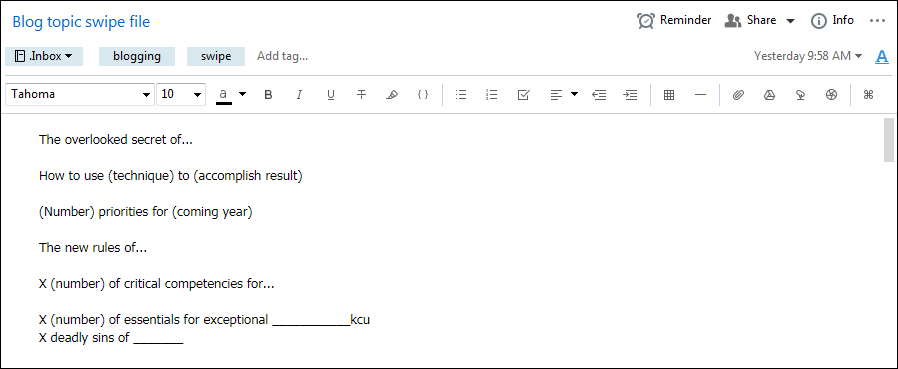
That’s why I created my first swipe file in Evernote two years ago, focused on collecting attention-grabbing headline styles. During the past two years, I have added over 200 examples to this note. I have used it many times to help inspire my thinking, both for new content approaches as well as to add that extra zing to the headline of a piece I’m working on.
As I learn more about content marketing, I have strived to position myself as more of a content strategist: someone who is focused on the overall marketing strategy that will differentiate a brand, create qualified sales leads and grow the business.
As I brainstormed ways I could elevate my thinking about content strategy, I realized that a swipe file could be a helpful tool. Like any other kind of creative thinking, content strategy is occasionally about new-to-the-world ideas. But more often than not, the best strategies are based on combinations of existing, successful approaches, adapted or tilted in a new direction.
The birth of my content strategy swipe file
As I thought about how to build this content strategy swipe file, I first considered my requirements:
- It needed to be searchable
- It needed to be structured, because it would contain a significant amount of data for each example – two columns should be adequate
- It needed to be very easy to create new examples quickly and easily, with a minimum of special formatting
- I wanted to create it in Evernote, since I use it as my personal knowledge base anyways
I soon realized that each of these examples would resemble a miniature database record, with fields to structure the data and store it in a consistent way.
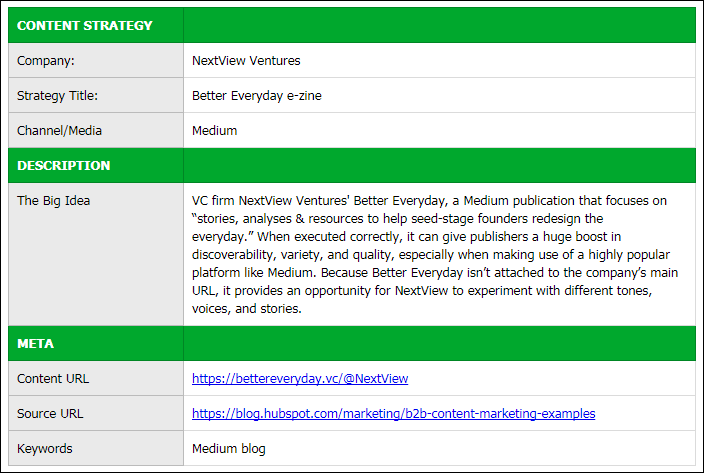
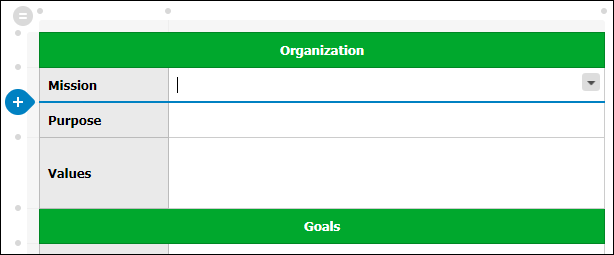
Looking at the new Evernote templates, it appeared that several of them were ideally structured to help me create what I had in mind. Many of these templates relied on green table cell backgrounds for headers and dividers, plus a light gray background color for field names. This simple style makes it easy to skim a record and quickly zero in on the information you’re looking for.
So I adapted an existing template to meet my needs. It was quicker and easier than I ever expected. Here is the process I followed:
Step 1: Decide on the fields you want to track
Step 2: Review the Evernote template library, which you can find by creating a new note, clicking on its “template” button and then viewing the template library (instructions on how to use it follow below). Look for one that’s similar in structure and scope to what you want to create. Note how the existing templates enable you to create sections with dividers, so you can segregate your data into groupings that make the most sense to you.
Where are the templates within Evernote?
 It would be easy to assume that you can simply go to the folders panel and find a folder called templates there, containing a library of the ones Evernote provides plus any custom ones you’ve created. But that’s not the case. They are somewhat hidden.
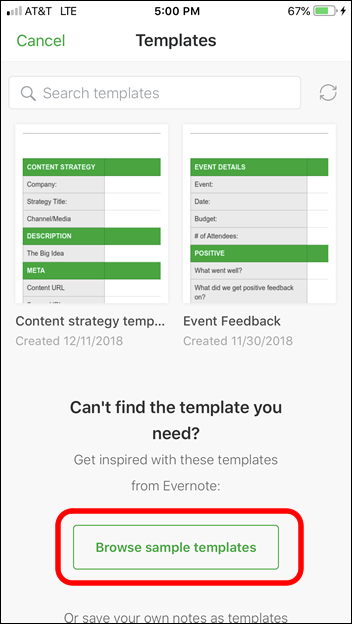
Whether you’re working with the desktop, web or mobile version of Evernote, you must first create a new note and then click on the “template” button at the top of the note. This will display any templates you have created at the top. Below that, you can tap on the button to view all of the templates that Evernote supplies, on a page within the Evernote website. You can then select one, save it as a local template within your account and customize it to meet your needs.
After reviewing a number of templates in the “for work” category, I selected the Strategic Planning template. It contains two columns and has multiple sections – perfect for the swipe file I envisioned.
Customizing a template
So I tapped on the three dots at the upper right corner of the template and saved it under a new name: Swipe File Example. Oddly enough, you can’t begin using it immediately. Instead, you must close the Evernote template web page, return to your new note, and tap the template button once again. The template you just renamed is now part of your collection.
The next step is to customize it. But please note: you can only build and modify table structures using the Windows, Mac and browser versions of Evernote. The iOS and Android apps don’t support this functionality.
To add a row or column, hover over the gray dot between the rows or columns where you’d like to insert, then click the green plus sign.
To delete a row or column, select it by clicking the gray tab at the top of the column or to the left of the row, click the arrow button in any of the selected cells, then choose to delete the row or column.
To merge cells to create a new section header, simply select multiple adjacent cells, then click the table menu button (arrow) to see the option to merge.
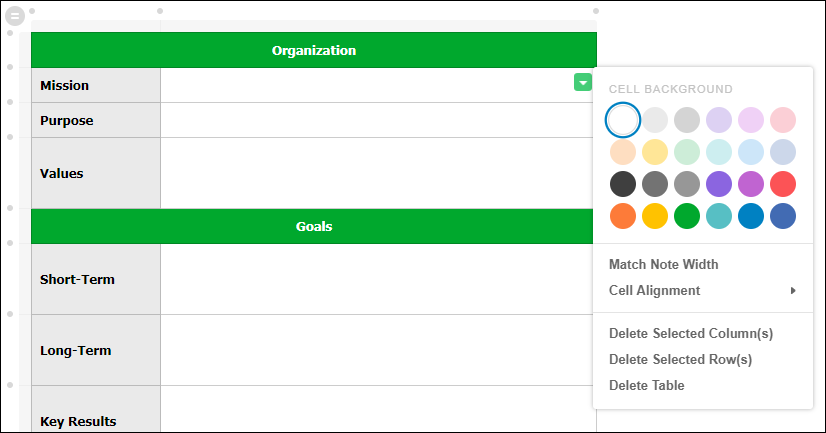
To change the background color of specific cells, entire rows or columns, or an entire table, highlight the cell, rows, or columns, then click the arrow button in any of the highlighted cells to choose a color.
The rest of the note’s content behaves like an editable note. You can change its headline, and rename the headings and field names.
When you’re done modifying the existing template, tap or click on the three dots menu button and select the “save as template” command. Give it a unique name that’s memorable, so you can tell it apart from any other templates you have saved.
Your last step is to create a folder where you will store all of your swipe file records. Placing your records in a dedicated folder makes it easy for you to search them or scroll through them, without having to wade through all of your other notes.
You must do this now, from the folder view, because Evernote won’t let you create a new folder on the fly, from within a note. Give your new folder a name that’s the same or close to that of your template. If you want it to appear first in your folder list, place a period (.) at the beginning of the folder name.
Now, you’re ready to start capturing creative content strategies – or any type of idea you choose!
How to use your new template
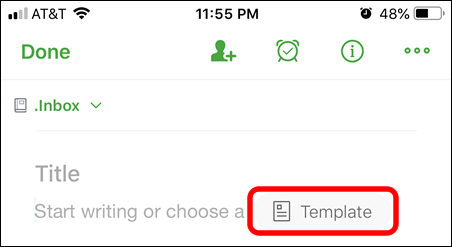 Click or tap the add a note button. At the top of the text area (below the note title), click on the “template” button. Tap on the image of your new template, and select the “apply template” option from the pop-up list that appears.
Your new note should now contain your template. Fill it in, and then use the folder button to move it from Evernote’s default folder to the new one you created.
What if you need to edit a saved template?
To simply change the name of a saved template, hover over it in your template gallery, click the Options menu (three dots), then select Rename Template.
Unfortunately, Evernote doesn’t currently support editing or adding to the content or structure of a template. Instead, you must open the existing template, modify it and then save it under a new name. You can then delete the existing template.
My notes you have previously created under the existing template remain as is; you will need to manually add the new fields and data to them. Fortunately, your existing records won’t disappear if you delete the template they’re based upon. Nor are they updated to add the new fields. You must add the new fields and data manually. It isn’t pretty, but it works.
Conclusion
It takes longer to explain how to set up a swipe file in writing than it does to actually create one and start using it. My advice to you: Don’t be afraid of playing around with Evernote’s templates. They’re actually VERY easy to use. Sure, they could use a few more features. But the developer has already given you a wealth of templates you can use as is to handle common tasks, or modify them to meet your needs, as I did. Have fun exploring them!